
via Deb at Smitten Kitchen
Good. Lord. This one might kill me. Fortunately, I am firmly committed to my resolution of eating healty and working out through the whole holiday season.
Firmly.
*drool*
Salted Chocolate Caramels
2 cups heavy cream
10 1/2 oz fine-quality bittersweet chocolate (no more than 60% cacao if marked)
1 3/4 cups sugar
1/2 cup light corn syrup
1/4 cup water
1/4 teaspoon salt
3 tablespoons unsalted butter, cut into tablespoon pieces
2 teaspoons flaky sea salt such as Maldon
Vegetable oil for greasing
Special equipment: parchment paper; a candy thermometer
Line bottom and sides of an 8-inch straight-sided square metal baking pan with 2 long sheets of crisscrossed parchment.
Bring cream just to a boil in a 1- to 1 1/2-quart heavy saucepan over moderately high heat, then reduce heat to low and add chocolate. Let stand 1 minute, then stir until chocolate is completely melted. Remove from heat.
Bring sugar, corn syrup, water, and salt to a boil in a 5- to 6-quart heavy pot over moderate heat, stirring until sugar is dissolved. Boil, uncovered, without stirring but gently swirling pan occasionally, until sugar is deep golden, about 10 minutes. Tilt pan and carefully pour in chocolate mixture (mixture will bubble and steam vigorously). Continue to boil over moderate heat, stirring frequently, until mixture registers 255°F on thermometer, about 15 minutes. Add butter, stirring until completely melted, then immediately pour into lined baking pan (do not scrape any caramel clinging to bottom or side of saucepan). Let caramel stand 10 minutes, then sprinkle evenly with sea salt.
Cool completely in pan on a rack, about 2 hours.
Carefully invert caramel onto a clean, dry cutting board, then peel off parchment. Turn caramel salt side up. Lightly oil blade of a large heavy knife and cut into 1-inch squares.
Showing posts with label cooking. Show all posts
Showing posts with label cooking. Show all posts
Wednesday, November 19, 2008
Friday, November 14, 2008
Holiday Baking: Cranberry Bliss Bars
Darn you Starbucks! Making such a delicious holiday bar that's the perfect combination of sweet/tangy/spicy/tart. Mmmmmm. And they're SO BAD for you!
But they make a lovely treat to give away, and last a good while, well-wrapped, in the refigerator. So you can pre-bake treats for teachers, co-workers, and any other deserving folks.
Knock-Off Cranberry Bliss Bars
Cake
1 cup (2 sticks) butter, softened
1 1/4 cups light brown sugar, packed
3 eggs
1 1/2 teaspoons vanilla
1 teaspoon ginger
1/4 teaspoon salt
1 1/2 cups all-purpose flour
3/4 cup diced dried cranberries
6 ounces white chocolate chips
1/4 c diced candied ginger
Frosting
4-ounces cream cheese, softened
3 cups powdered sugar
4 teaspoons lemon juice
2 teaspoons lemon zest
1/2 teaspoon vanilla extract
1/2 teaspoon lemon extract (optional)
1/4 cup diced dried cranberries
Drizzled Icing
1/2 cup powdered sugar
1 tablespoon milk
2 teaspoons vegetable shortening
1. Preheat oven to 350°F.
2. Make cake by beating butter and brown sugar together with an electric mixer until smooth. Add eggs, vanilla, ginger, and salt and beat well. Gradually mix in flour until smooth. Mix 3/4 cup diced dried cranberries, white chocolate, and candied ginger into the batter by hand. Pour batter into a well-greased 9x13" baking pan. Use a spatula to spread the batter evenly across the pan. Bake for 35 to 40 minutes or until cake is light brown on the edges. Allow cake to cool.
3. Make frosting by combining softened cream cheese, 3 cups powdered sugar, lemon juice, zest and extracts in a medium bowl with an electric mixer until smooth. When the cake has cooled, use a spatula to spread frosting over the top of the cake.
4. Sprinkle 1/4 cup of diced cranberries over the frosting on the cake.
5. Whisk together 1/2 cup powdered sugar, 1 tablespoon milk, and shortening. Drizzle icing over the cranberries in a sweeping motion or use a pastry bag with a fine tip to drizzle frosting across the top of the cake.
6. Allow cake to sit for several hours, then slice the cake lengthwise (the long way) through the middle. Slice the cake across the width three times making a total of eight rectangular slices. Slice each of those rectangles diagonally creating 16 triangular slices.
Makes 16 bars.
Tuesday, October 7, 2008
Halloween Tricks and Treats
It's been busybusybusy in the MonkeyFace household. School is in full swing, and I am dividing my time between working, house renovating (not mine, sadly), and crafting. (Notice the utter lack of "working out?" Because, so have my jeans. *sigh*)
I so totally love this time of year. The cooler weather, the fun harvest-y things, the apple picking, the pumpkin bread, the Halloween excitement.
Trin was assigned "snack" for her class today. And while I completely understand her teacher's "no sweets for snack" policy, it did make me a little sad. What good is being snack mom if I can't go crazy making spider-oreo-topped cupcakes with green goo filling? *sigh* Schools these days, I tell ya!
 So, we went a healthier route, and made "pumpkin pinwheels" and "witchy brooms."
 The pumpkin pinwheels are sundried tomato wraps filled with cream cheese, cheddar, monterey jack, and a smidge of GarlicGarlic, then rolled, sliced into the "pinwheels," and festooned with a party-pick "stem." Both girls were skeptical at first, but after a taste of the filling, spent the remainder of the assembly process strategically angling for the scrap end-pieces.
The brooms are pretzel rods with strategically sliced fruit roll-ups rolled around the bottom. They were pronounced "really awesome" by the six-year-old. I was also informed that "I rock" and "I make the best snacks and all the kids love them." Not bad for the ol' mom-ego, that kid.
After the kiddos were bathed and booked and put to bed, I turned my attention to finishing up  my Halloween craft exchange project.
 my Halloween craft exchange project.
 I stayed up WAAAAY too late finishing it, but I am pretty pleased with how it turned out, overall.
Here's a shot of it all pieced together, before I started quilting. The little witchie-poo in the middle is embroidered (which, WOW are those skills RUSTY), and then the four squares are horribly wonky log-cabin, but, I kind of like the overall imperfect effect. It's certainly not going to win any blue ribbons at the county fair, but for a dollar-limited craft exchange, I think it fills the bill alright.
 This is my favorite part of the embroidery. I just love the little French-knot spider! The embroidery design was inspired by Quixotic Pixels. I didn't use her pattern, but I loved the cute li'l witch with crazy hair and stripey stockings.
 I have kind of a freakish love for French knots. I think it might be because I was never able to do them until, oh, the last six months or so? I think I finally learned from a link off of the Alabama Stitch Book flickr set -- one of the women in the group knots off the end of her thread with French knots. Her explanation just clicked for me, and voila! Now I can do the knots!
I'll try to get a good picture of the finished product before I send it off later today, but since I finished after 1:00 this morning, I kind of just fell into bed and figured I'd let the pictures take care of themselves later.
Monday, September 15, 2008
Recipe: Mac 'n' Cheese
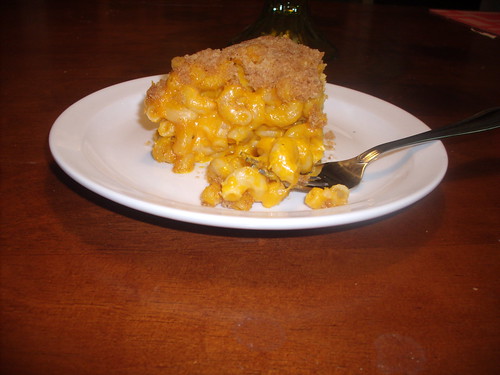
So, Tracy posted about homemade mac 'n' cheese last week. And then, the weather was drizzly and grey all weekend, so of COURSE mac 'n' cheese had to be made.
I remember that Rachael Ray once did a butternut squash mac 'n' cheese, and, while I know it is fashionable to hate on RayRay, anything that lets me sneak veggies into my unsuspecting picky eater is all good in my book.
So, I did a sort of remember it/wing it combo here. It turned out SUPER yum -- enough that I think this might become my default cheese sauce recipe, and a regular in the rotation.
Vivi helped make the cheese sauce and sprinkle on the "cinnamon" (breadcrumb topping), and ate two servings. THAT is some success, right there.
Mac 'n' Cheese
1 pound whole wheat cavatappi or elbow noodles, cooked about 1 minute less than shortest cooking time given on package
2 tbsp butter
1 small onion, grated
1 tsp ground mustard
1 generous pinch salt (around 1.5 tsp)
1 package frozen butternut squash, thawed
4 grinds of black pepper (1/4 tsp)
1/2 c unsweetened vanilla almond milk (but could sub liquid dairy of any persuasion here)
2 c grated sharp cheddar cheese
1/2 c grated parmesan
1 tbsp butter, melted
1/2 c breadcrumbs
Preheat the oven to 350.
Prepare pasta according to package directions. While pasta cooks, heat a large, deep nonstick skillet over medium heat. Melt the 2 tbsp of butter. Add the grated onion, mustard, salt, and pepper, and saute until onion is fragrant and translucent. Stir in the butternut squash puree and almond milk, and warm through. Incorporate the cheddar cheese, stirring until melted. Add a good-sized ladleful (about 1/2 c) of the pasta cooking water to thin the sauce. Reduce heat to low, stir in the parmesan.
Drain the pasta, and pour the noodles into the cheese sauce, tossing to coat. Turn the noodle mixture into a casserole dish. Combine the breadcrumbs and melted butter, and sprinkle over the noodles as a topping.
Bake 15-20 minutes, or until sauce is bubbly and top is browned.
Subscribe to:
Comments (Atom)