
via Deb at Smitten Kitchen
Good. Lord. This one might kill me. Fortunately, I am firmly committed to my resolution of eating healty and working out through the whole holiday season.
Firmly.
*drool*
Salted Chocolate Caramels
2 cups heavy cream
10 1/2 oz fine-quality bittersweet chocolate (no more than 60% cacao if marked)
1 3/4 cups sugar
1/2 cup light corn syrup
1/4 cup water
1/4 teaspoon salt
3 tablespoons unsalted butter, cut into tablespoon pieces
2 teaspoons flaky sea salt such as Maldon
Vegetable oil for greasing
Special equipment: parchment paper; a candy thermometer
Line bottom and sides of an 8-inch straight-sided square metal baking pan with 2 long sheets of crisscrossed parchment.
Bring cream just to a boil in a 1- to 1 1/2-quart heavy saucepan over moderately high heat, then reduce heat to low and add chocolate. Let stand 1 minute, then stir until chocolate is completely melted. Remove from heat.
Bring sugar, corn syrup, water, and salt to a boil in a 5- to 6-quart heavy pot over moderate heat, stirring until sugar is dissolved. Boil, uncovered, without stirring but gently swirling pan occasionally, until sugar is deep golden, about 10 minutes. Tilt pan and carefully pour in chocolate mixture (mixture will bubble and steam vigorously). Continue to boil over moderate heat, stirring frequently, until mixture registers 255°F on thermometer, about 15 minutes. Add butter, stirring until completely melted, then immediately pour into lined baking pan (do not scrape any caramel clinging to bottom or side of saucepan). Let caramel stand 10 minutes, then sprinkle evenly with sea salt.
Cool completely in pan on a rack, about 2 hours.
Carefully invert caramel onto a clean, dry cutting board, then peel off parchment. Turn caramel salt side up. Lightly oil blade of a large heavy knife and cut into 1-inch squares.
Wednesday, November 19, 2008
Friday, November 14, 2008
Holiday Baking: Cranberry Bliss Bars
Darn you Starbucks! Making such a delicious holiday bar that's the perfect combination of sweet/tangy/spicy/tart. Mmmmmm. And they're SO BAD for you!
But they make a lovely treat to give away, and last a good while, well-wrapped, in the refigerator. So you can pre-bake treats for teachers, co-workers, and any other deserving folks.
Knock-Off Cranberry Bliss Bars
Cake
1 cup (2 sticks) butter, softened
1 1/4 cups light brown sugar, packed
3 eggs
1 1/2 teaspoons vanilla
1 teaspoon ginger
1/4 teaspoon salt
1 1/2 cups all-purpose flour
3/4 cup diced dried cranberries
6 ounces white chocolate chips
1/4 c diced candied ginger
Frosting
4-ounces cream cheese, softened
3 cups powdered sugar
4 teaspoons lemon juice
2 teaspoons lemon zest
1/2 teaspoon vanilla extract
1/2 teaspoon lemon extract (optional)
1/4 cup diced dried cranberries
Drizzled Icing
1/2 cup powdered sugar
1 tablespoon milk
2 teaspoons vegetable shortening
1. Preheat oven to 350°F.
2. Make cake by beating butter and brown sugar together with an electric mixer until smooth. Add eggs, vanilla, ginger, and salt and beat well. Gradually mix in flour until smooth. Mix 3/4 cup diced dried cranberries, white chocolate, and candied ginger into the batter by hand. Pour batter into a well-greased 9x13" baking pan. Use a spatula to spread the batter evenly across the pan. Bake for 35 to 40 minutes or until cake is light brown on the edges. Allow cake to cool.
3. Make frosting by combining softened cream cheese, 3 cups powdered sugar, lemon juice, zest and extracts in a medium bowl with an electric mixer until smooth. When the cake has cooled, use a spatula to spread frosting over the top of the cake.
4. Sprinkle 1/4 cup of diced cranberries over the frosting on the cake.
5. Whisk together 1/2 cup powdered sugar, 1 tablespoon milk, and shortening. Drizzle icing over the cranberries in a sweeping motion or use a pastry bag with a fine tip to drizzle frosting across the top of the cake.
6. Allow cake to sit for several hours, then slice the cake lengthwise (the long way) through the middle. Slice the cake across the width three times making a total of eight rectangular slices. Slice each of those rectangles diagonally creating 16 triangular slices.
Makes 16 bars.
Thursday, November 13, 2008
Pillowcase Peasant Dress

I had bought the sheet set thinking that I'd make the girls more pillowcase dresses out of the pillowcases. However, it turns out? I am not the fastest in the project-y completion rate. Add to that the fact that it got fall-chilly in the space of, oh, two days, and that Viv won't wear t-shirts under a dress (yeah. The next few months are going to be FUN, I tell you), and the idea of making the pillowcase dresses had. . . well, faded somewhat in its appeal.
But, I still had these pillowcases.
And I still had girls begging for dresses.
So, I went all anarchist-alchemist-pattern-free-mix-it-up-y and decided to wing it using a tutorial and some pictures of dresses that looked cute as a rough guide.
I used the Peasant Blouse tutorial from Just Tutes as a jumping-off point.
I cut the top off of the pillowcase, then opened it up to use it for the sleeves. I cut the sleeves a *wee* bit short, which made the gathering somewhat challenging.
The tutorial has separate back and front pieces, which, to be honest, would have been MUCH easier to work with/line up than my method of keeping the pillowcase as a whole and adding the arms onto it, but. . . live and learn, right?
So, I followed the tutorial steps of stitching the sleeves to the front and back, but then, there wasn't really very much "sleeve" left to stitch to itself (see: cut too short, sleeves, above). Which meant the "make the pocket for elastic which will create the cute gathering on the sleeves" was completely out of the question.
Time to punt.
I remembered that Angry Chicken had super-adorable dresses that she made for her girls with fold-over elastic used to gather the sleeves and neckline. So, I used some blue FOE for the sleeves. The sleeve edges didn't quite match up on the underside of the arm, which led to some cussing. But, after some patience and invocation of St Jude, the FOE and I triumphed, and the 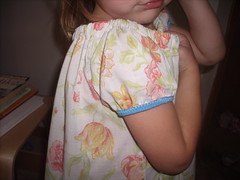 sleeves were both gathered and finished. Perhaps not quite as neatly as I might have wished, but since the dress is going to be worn by a child who spends most of her day covered in paint, marker, play-dough, ketchup, or some other disturbingly unidentifiable sticky substance, I suppose perfection is not necessary.
sleeves were both gathered and finished. Perhaps not quite as neatly as I might have wished, but since the dress is going to be worn by a child who spends most of her day covered in paint, marker, play-dough, ketchup, or some other disturbingly unidentifiable sticky substance, I suppose perfection is not necessary. After the fight with sleeves, it was super-relieving that Just Tutes's neckline instructions worked a treat. Am I alone in my incredibly dorky love for how magically easy pressing makes sewing? "well-pressed is half-sewn," indeed. It doesn't take much to make me happy, I know. But there's a lot of joy to be had in being someone who's easily impressed!
After gathering, the dress looked good, but still needed a little something. I stole more from the Chicken dresses, and added a piece of elastic to gather the bodice, which was just the thing.
I will definitely make this again, but I'd probably cut the pillowcase apart the next time to get slightly better shaping, and better attachment of the sleeves. But, for my first "totally make this up as I go" project, it didn't turn out too bad!
Wednesday, November 12, 2008
Tagged by meme
Dragonfly tagged me with a "four things" meme. I've been a blog slacker, so I didn't realize it for a couple of weeks! ;)
4 things I did today (I'll count "day" as "24 hours"):
4 things I did today (I'll count "day" as "24 hours"):
- Finished a twirly skirt.
- Comforted a nightmare-ing child.
- Donated to WUWM's fund drive.
- Drank coffee and wrote code (this one is cheating, I realize)
4 things on my to-do list:
- Renew my license plates.
- Get passport pictures for the monkeys.
- Nail down Christmas plans.
- Run.
4 of my guilty pleasures:
- heavy cream in my tea
- sleeping in on a rainy day
- Rachel Ray
- The Order of the Stick
4 random facts about me:
- I don't have a belly button.
- My little fingers are bent inward on both hands. Both of my girls ALSO have bent little fingers.
- I was a member of a nationally-ranked parliamentary procedure team (DORK!!)
- I am so conflict-averse that I can't watch Jerry Springer/Montel/any of the talk shows with yelling and screaming. I get too stressed out.
Tuesday, November 11, 2008
Tutorial Round-Up

My recent projects (still unpictured, 'cuz I am a LOUSY photographer!) have used some fantastic on-line tutorials/free patterns, and I want to give credit where it's due:
Ottobre purse -- I had a moment of confusion badness with the bottom edges, but figured it out and rectified it before it was too late. Not a fault of the pattern -- I just couldn't quite wrap my head around how it was supposed to work.
House on Hill Road twirly skirt -- Easy-peasy, lemon-squeezy. Great, clear instructions and beeyouteeful photos.
WiseCraft clothespin dollies -- there are lots of tutorials for these, all over, but Blair's version is my very favorite. My Secret Santa has three little girls, so they each get their own set, wrapped in a felt pouch, along with a mini-book about, respectively, a fairy, a ballerina, and a mermaid. I'm going to do a similar thing for my goddaughter and her sister for Christmas. Homemade dollies + a book = my perfect idea of a little-girl Christmas gift.
Of course, MY monkeys want a Wii. Ingrates.
Monday, November 10, 2008
Watch This Space
I have photos coming soon of my two newest projects: a dress for the Smaller Child (gingham and awesome Japanese animal print fabric) and a purse as a gift for a Christmas exchange with a friend from Australia. It was fun to do something light and summery when the weather here is all dreary and winter-starting.
Subscribe to:
Posts (Atom)